


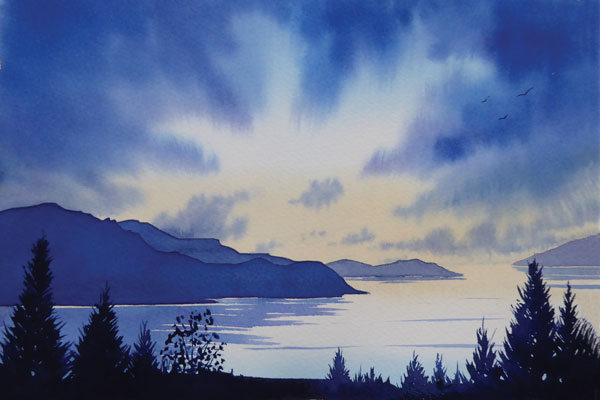
Learn how to paint a tonal watercolour landscape with this step-by-step tutorial full of helpful tips and advice, by Lesley Linley.
Make a plan and do trial runs
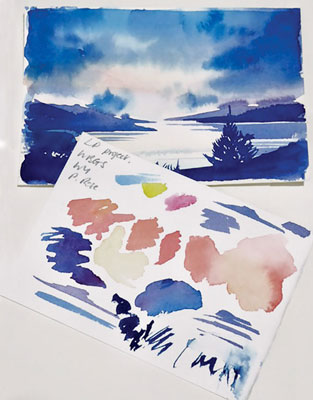
Planning is important in watercolour, because you won’t often be able to paint over your mistakes. Jot down what colours and techniques you might use, and how many steps there will be. Use the materials that you plan to use for your painting, and allow the paper to dry when necessary, just as if you were working on the painting itself.
Watercolour landscape tutorial
You will need:
- Saunders Waterford High White 300gsm NOT paper, 7½x11in. (19x28cm)
- Brushes: Round No. 10 Winsor & Newton, Sceptre Gold III No. 14 round
- Putty eraser
- Paints: Winsor yellow, permanent rose, Winsor blue (green shade)

Step 1

Copy this drawing. Remove any loose graphite or heavy pencil marks by dabbing at them with a putty eraser.
Want to go back to basics? Check out our ultimate guide to watercolour painting for guides on everything from choosing the right watercolour paper to learning how to use masking fluid.
Step 2

Use clean water to prevent the orange and blue blending and giving soft edges.
- The first wash will be made on dry paper so you’ll need colours prepared in the palette. Dilute some of the blue and, separately, prepare a mix of red and yellow to create a soft pale orange. Although your colours will dry paler, don’t make the first washes too strong; you’ll be painting other washes over them and don’t want to disturb the colour. Even with staining colours, if they’re applied thickly, surface colour will lift.
- Paint as shown: blue, clean water, orange, clean water, blue. Each band should touch the previous wet band then allow them to blend. The clean water prevents colours from mixing and ensures soft edges. When all the bands are painted, use a thirsty brush – a clean damp brush, dabbed on paper towel to dry it a little – to remove pools of water or paint that may have formed at the edges of the wash. Mopping up these pools helps prevent backruns (watermarks). Allow this to dry.
- If the colour is too pale, rewet the paper and apply more colour where needed. Allow to dry before continuing.
Top Tip: To save time during painting, dedicate one brush to blue, one to yellow and so on, so you can spend less time washing brushes.
Step 3

Drop colour into wet paint (wet in wet), adjust its strength and the amount of paint on the brush to exercise some control. Some of the first wash shows through this glaze and influences the cloud colour.

- Prepare a mix of blue with a very little red added; you don’t want to make purple. By placing colours apart on your palette, you can pull colour in from each side and use the mix in the centre or take more blue from one side, or more red from the other, for variation of colour.
- Rewet the sky with clean water and drop in clouds (by touching the loaded brush to the surface) as shown. Allow the colour to spread; don’t interfere too much. Paint the large clouds first then smaller ones as the paper becomes drier and the brush has less paint in it. Allow to dry.
If you're new to watercolour, don't stop here! Explore our other beginner-friendly guides to learn all you need to progress and develop your watercolour skills.
Step 4

Wet-on-dry technique - Use a mix of blue and red to paint the hills, putting plenty of paint on to help keep the whole wash wet and working quickly to reduce the chance of backruns occurring. Allow to dry.
Top Tip - Be aware that the edges of the paper and the areas of the wash that meet dry paper will dry much quicker than the centre. Notice how clouds that overlap the orange areas are slightly less blue than those with no orange beneath; the complementary colours of blue and orange neutralise one another a little.
Step 5

Wet-in-wet technique - Rewet the sky area. Drop in clouds of a stronger mix of the red and the blue. Allow to dry.
Step 6

Build tones with another wet-on-dry wash
- Paint the nearer hills with red and blue, a similar strength to Step 5. This will look quite dark as it overlays the previous wash.
- Loosely add lines to the sea to reflect the hills. Notice how these lines are paler than the hills because you have only pale colour beneath them. Allow to dry.
Step 7

The use of strong, but still fluid darks, neutralises the blue-purple colour by adding yellow (the complementary colour).
Prepare a good amount of a strong blue and red mix; it’s quite concentrated but still needs to be able to flow. Add a tiny amount of yellow to neutralise the purple a little.

Practise painting a tree on spare paper (above). Put a pool of paint onto the paper and quickly ‘flick’ branches from this by moving the brush in an upward and outward direction; speed helps keep the brushstrokes lively.
Paint the foreground. The photograph shows the glistening wetness of the wash; this will dry matt blue.
I added three birds to the dark sky on the right to complete the painting.
Step 8

Evening Light on the Sound, watercolour on Saunders Waterford High White 300gsm NOT paper, 7½x11in (19x28cm)
The complementary colours of orange and blue look bright when placed side by side, but neutralise when mixed by overlaying in glazes, or when mixed in the palette. A wide range of tones was used here, from very light to very dark.

Comments
Login or register to add a comment
No comments