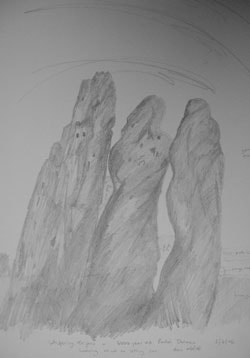
I always begin by making several detailed drawings and colour notes on location, from which I choose one to develop into a batik, see my drawing of the Whispering Knights in Oxfordshire, (right) a 6,000-year-old monument in weathered limestone. Many of the stones have been removed, with only three now standing upright, and the large slab of stone (capstone) that formed a 'roof' to the monument has long since gone from its position. I chose the view that revealed the monument best for its form and name.
Back in the studio I drew an outline of the monument lightly in charcoal onto a piece of white 100 per cent cotton fabric approximately A2 size. The material had to be 100 per cent natural fibre for the dyes to take, and also for the wax to penetrate into the fibres for the resist.
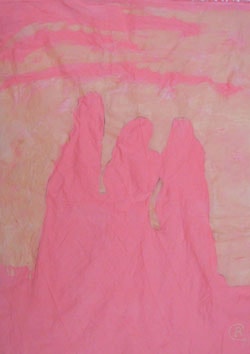
My first dye bath was a pale peach and I immersed the whole cloth in it. The dyes I use are Procion fibre reactive cold-water dyes and they are fixed into the cloth with a mixture of urea, common salt (sodium chloride) and washing soda (sodium carbonate). The amount of dye and fixative used depends on the weight of the cloth and the depth of colour required; the proportions I normally use for one level teaspoon of dye are approximately eight rounded teaspoons of salt; four rounded teaspoons of soda and two level teaspoons of urea. As the dyes come in powder form it is better to wear a facemask and use rubber gloves when handling them or the wet batik.
My supplier for Procion dyes and tools is Candlemakers Supplies, 28 Blythe Road, Olympia, London W14 OHA; 020 7602 4031, who can supply all except the cloth. All the materials are also available from www.fibrecrafts.com.

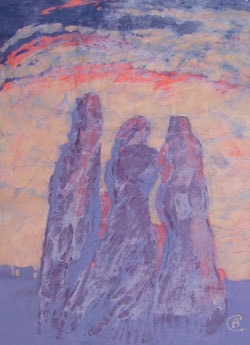
The palest colours are dyed first and the colours that follow are influenced by those preceding them. This limits the colour sequences. For example, in The Whispering Knights I have gone from pale peach to bright pink to mauve — that is, through red-related colours.
It takes up to an hour to develop the colour evenly and to full saturation, during which time the batik is turned frequently and the dye bath agitated to ensure even dyeing.
When the dye process is complete the batik is rinsed in clear water to remove excess dye and dried naturally. My neighbours have grown used to seeing very odd 'washing' on the line and there were resigned groans from my children when they returned from school to the smell of heated wax rather than baking cakes.
Once the peach-coloured cloth was dried I then needed to put a resist (wax) on the area to be retained in that colour so that I could dye all other areas bright pink. The wax that creates the resist is a mixture of beeswax and paraffin, heated in a special thermostatically controlled batik pot. The wax must be liquid enough and warm enough to soak into the cloth when applied.
For large areas I apply the wax with hog hair brushes: cheap ones will do, for example those by Crimson & Blake. They must be 100 per cent bristle as synthetic brushes will melt. For fine lines I use a tjanting (pronounced canting). This is an Indonesian tool consisting of a copper bowl that acts as a reservoir and a spout down which the molten wax flows in a continuous line.

The wax resist was applied to the bright pink areas of the batik that I wanted to be retained and the cloth was then dyed with mauve pink. In the same way, wax was applied to each of the colours I wanted retained throughout the sequence of dye baths. The sequence of dye baths for this batik was: 1: peach; 2: bright pink; 3: mauve pink; 4: violet; 5: violet blue; 6: blue grey; 7: crimson; 8: deep blue.
Removing the wax
After the last dye bath has been completed and the cloth dried it is placed between several sheets of clean absorbent paper (I use wallpaper lining paper) and a hot iron is applied. The wax melts into the sheets of paper and the batik emerges. To remove all traces of wax, the batik can be dry cleaned.
I stretch and dry mount each batik onto museum quality mountboard using pH neutral PVA adhesive (archival quality) and frame it with a mount and glass in the same way as a watercolour. As long as they are never exposed to direct sunlight or high humidity, Procion dyes are very stable.

Mistakes made during waxing and dyeing are difficult to rectify and the only really sensible thing to do is to put the failure in the bin and start again. In my early days, 30 years ago, as a newcomer to the technique, this happened quite often but is a rare event now.
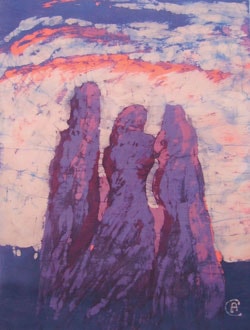
The Whispering Knights took me 24 hours to complete but others of more complex colour sequences and up to 30 dye baths take a good deal longer. If I have a red colour sequence and a green colour sequence in the same batik I have to wax out all areas on the white cloth, say for the red sequence, develop all the green-related areas, remove wax from the white areas and then develop the red sequence of colours. I control the amount of 'crackle' effect in the batik by altering the ratios of beeswax and paraffin wax.
This is an exciting technique that I have used on subjects as diverse as Bristol cathedral and bluebell woods. The qualities you most need are patience, an ability to think in reverse, and enjoyment from getting messy. The process is as important as the end product.
The finished batik The Whispering Knights, 231/2x19in. (60x48cm)
This extract is from an article by Annabel Carey in the August 2007 issue of The Artist


Comments
Login or register to add a comment
No comments