


Cyclamen Under the Hedge, mixed media.
Learn how to create hatched and cross hatched pen and ink drawings in this demonstration by Julie Powell.
Examples of cross hatching in pen and ink drawings
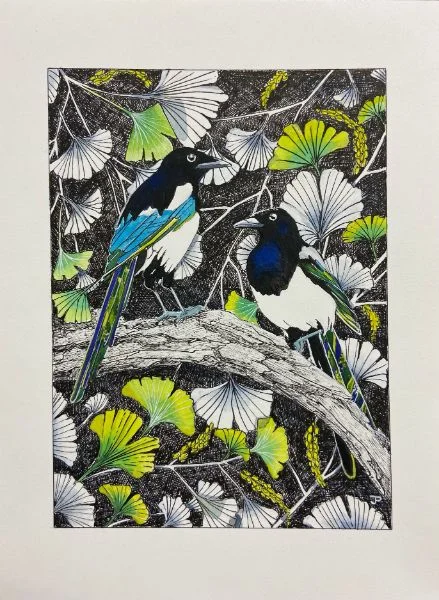
Magpies in the Ginkgo Tree, pen and ink, (A4)
I decided to try drawing with pen and ink following a period of illness, which stopped me from being able to get out painting. I had previously focussed on painting landscapes or still life subjects in oils, or occasionally acrylics or soft pastel.
My choice of subject matter was whatever I could find in our own garden or the gardens of kind neighbours. My first inspiration came from a demonstration of a fox. I saw this cross hatch and collage on Painters Online by Judit Matthews.

Japanese Ginkgo and Acer Leaves, pen and ink, (A4)
I began to make drawings of plants and birds. I simplified and stylised them, adding hatched and cross hatched backgrounds, examples of which you can see above and below.

Fruits of Autumn, pen and ink, (A4). This is an example of a random hatched background.
Winter Redwings, below, is a personal favourite. Here I decided to create several layers of hatching at the bottom and less layers towards the top. I used masking fluid to give the impression of snowflakes before I began hatching. I think this one would make a lovely Christmas card.
Discover a host of guides and inspiration with access to every issue of Leisure Painter & The Artist magazines since 2015 as a Studio Member!

Winter Redwings, pen, ink and watercolour
How to create a cross hatched background
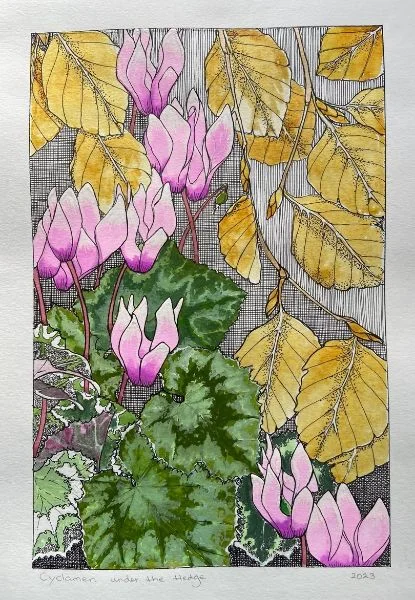
The demonstration below is an example of how I create my pen, ink and watercolour paintings.
Materials used:
- Smooth heavy cartridge or watercolour paper which will accept some paint - a 140lb HP paper works well
- I use different types of ink pens. I have fountain pens, dip pens, and technical fineliner drawing pens. They come in various thicknesses. I also use a Japanese Fude pen and homemade reed pens.
- Acrylic inks
- Watercolour

The inspiration behind the pen and ink drawing
Late autumn saw our beech hedge retaining its bronzed leaves and tight buds, all ready for the spring. Underneath the hedge we have many cyclamen plants and I wanted to draw the lovely shapes of the flowers and leaves.
I began the drawing just before a cold snap which unfortunately ruined the flowers, but the leaves survived. I got the drawing done before the frost, and completed the painting using a pink cyclamen purchased at the garden centre.
Step one

Begin by drawing a 2cm border using a ruler and a pencil. This is the only time I use a ruler. I complete all hatched lines freehand because I prefer the natural appearance.
Next, outline the drawing in pencil, being careful to make a pleasing and balanced composition.
Step Two

At this stage, start thinking about where the colours might go. You may select some leaves or flowers to be in colour whilst leaving others in black and white.
Work on the cyclamen leaves first, as these will be the most complex part of the picture, using watercolour. Be sure to reserve areas of white to ensure the leaves will stand out against the background.
I don’t usually ink over the drawing until all the colour is in place. However, I couldn’t resist inking over some of the pencil lines to get an idea how it would look.
Top Tip! Ensure your inks and pens are archival, non-fading and water resistant so those lines will not smudge if painted over.
Step Three

Next, complete all the coloured areas. For this painting, I used a transparent acrylic ink for the beech leaves. This was the perfect colour and great for mimicking the ageing texture of last year’s leaves.
Occasionally I add salt at this stage to create texture on the leaves. Once the ink or paint is dry, leave the picture overnight under a heavy pile of books.
It's possible to change the order of things when using these techniques. For this painting, I started on the background hatching before the colour was completed.
This was because the particular purplish pink was not easy to mix from the colours I had. However, I found an acrylic ink online called ‘Cyclamen Pink’. Whilst I waited for the delivery of that, I began hatching in the bottom corner.
Step Four

Having completed all the colour, spend some happy hours drawing over all the pencil lines with ink.
I used fineliner pens but, had I wanted more broken or random lines, I could have chosen to use dip pens or reed pens.
Learn how to make your own reed pen with this demonstration.
Fude pens are wonderful for lines which change from thin to fat, but that was not what I was looking for here.
Once all the lines are drawn, look for places to use other techniques. You can try stippling, broken lines, or repeat patterns. These patterns can be tiny figure eights or random swirls. Sometimes I use tiny circles, repeat tile shapes or parallel lines.
Top Tip! Use a ruler to create a straight line as a guide if you don't feel confident that you can keep your lines straight. Personally, I prefer slightly wonky lines!
Next, use an eraser to remove any pencil showing through. Then begin hatching, firstly with vertical lines and then horizontal ones. Clearly there may be pictures where a more random hatched back ground is preferable, such as in Fruits of Autumn above.
Sometimes I hatch over areas again and again if I want to have a dark background. Occasionally I create a vignette effect by carefully washing over the corners with thin ink. You can see an example of this in my drawing Japanese Ginkgo and Acer Leaves, above.
Step Five

Continue hatching until all areas are complete. I decided to have darker hatching at the bottom and less hatching towards the top.
I achieved this by cross hatching vertically, horizontally, diagonally left to right. I cross hatched diagonally right to left in the lower areas. As you move up the picture, cross hatch in only two directions and then in only one direction at the top.
Top Tip! If you find any black lines where you feel they don’t work, white gouache is your best friend! Gouache is perfect for any correcting errors or slips of the hand.
Finally, go over the pen lines once more and add some white gouache to the tips of the cyclamen petals. You have now completed your pen and ink drawing with a cross hatched background!

About Julie Powell
See more from Julie in her Painters Online gallery or on Instagram.
Comments
Login or register to add a comment