


Evening Sun Setting Over Fields in Kilham, Derwent Graphik Line Maker and Line Painter on Derwent Sketchbook paper, (38x28cm)
Tony Hogan uses the exciting colours from Derwent’s new Graphik Line Maker and Line Painter ranges and explains how to make the most of their unique qualities, and presents a demonstration for you to follow.
About Graphik Line and Paint Maker
It’s always a pleasure to receive a new product from an established manufacturer like Derwent, knowing you can depend on the quality. On opening the package of the Graphik Line Painter pens, I was delighted by the wonderful range of 20 modern, bright colours. Alongside these was a set of Graphik Line Makers, set in varying nib sizes from 0.05 to 0.8 in black, and in sepia and graphite in nib sizes 0.1 to 0.5.
Top features:
- Lightfast
- High quality
- Quick and easy to use
- Good range of colours
Where to buy
Derwent Graphik Line Makers are classic drawing pens with high-quality Japan nibs and water-based pigment ink. They are available individually in black, sepia and graphite in varying nib sizes and in sets of three and six and can be purchased from Jackson's Art Supplies by clicking here and from art shops and other online retailers.
Graphik Line Painters are a fusion of fine lines and highly-pigmented opaque paint and are available individually and in sets of five colours and 20 colours and can be purchased from Jackson's Art Supplies by clicking here and from art shops and other online retailers.
SEE THE FULL GRAPHIK RANGE HERE
The Line Maker

Kilham Church from Back Lane, Derwent Graphik Line Maker on Derwent Sketchbook paper, (46x30.5cm)

Old Tree After the Storm, Derwent Graphik Line Maker on Derwent Sketchbook paper, (46x30.5cm)
Top tip
Do remember to replace all the caps after use and, where possible, during use when switching from one pen to another to prevent the nib from drying out.
It is a simple procedure and saves the annoyance of ending up with a dried out pen, which needs replacing for no other reason than forgetting a moment’s good practice.
The Line Painter
I noted that on a cartridge sketchbook paper the drying time was almost instantaneous, which restricted the blending and flooding of colour, but on Saunders Waterford, Bockingford and Hahnemühle Bamboo papers I had far more opportunities, including splattering with flood effect on wet paper, runs and bleeding of colours.
How to use Line Painter
To activate the Line Painter, shake the pen well then depress the nib for two seconds and wait for the paint to flow down to the tip. Once the paint is visible on the nib you do not need to pump again unless it stops flowing.
If too much paint comes through, it may start flooding. I don’t consider this a problem, as it creates the effect of an old-fashioned ink pen (where you dip the nib in ink) and makes for nice organic shapes and loose elements.
If you press the Line Painter nib gently onto a hard surface, a small flood of colour is left behind, which can be used with a brush to paint in an area you wish to strengthen in tonality.
Features and benefits
Video from Derwent Youtube channel
Demonstration using Graphik Line and Paint Makers
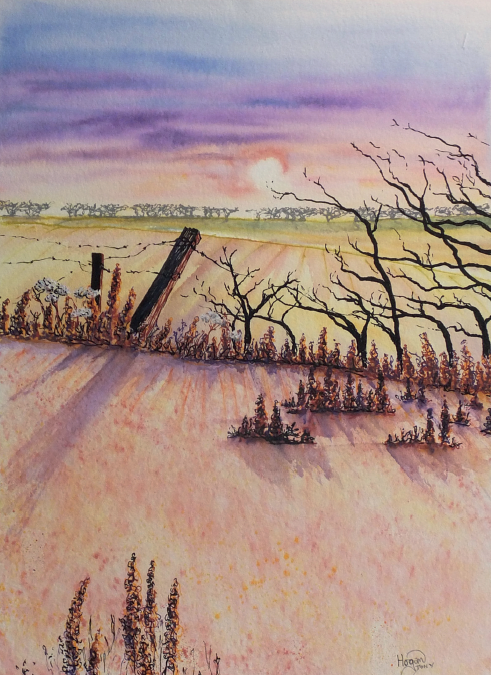
Evening Sun Setting Over Fields in Kilham
This painting was inspired by a quick sketch made on-site with the Line Makers which was developed later in my studio.
Step 1

- I selected the paper for its whiteness and knowing it would allow a wide range of techniques to be used.
- With a large flat sable brush I flooded the top part of the paper with water as if starting a watercolour wet-in-wet sky.
- Turning the paper sideways to allow paint to run horizontally when completed, I quickly touched the area nearest the horizon with brickroad yellow then working with a Derwent waterbrush (or use a watercolour brush and keep dipping it in water, if preferred), I moved the colour around.
- I retained the white for the setting sun and used the same technique to bring in colours; these colours were clockwork, tom, bricklane, rain and brilliant, in that order, as I moved to the top of the sky.
- The brightness of the sun was emphasised by lifting paint off the tip of the colour, called tom, with the waterbrush and painting around it.
- Tonal balances were altered easily by using this technique and by working with the water brush, without pigment, to dilute the values while the paper was still wet.
Step 2

- Rotating the paper to its final portrait format I moved on to the distant fields.
- I drew a line on the dry paper with the colour, called fingers, to define the horizon and the proportions of the field to the front of this.
- Now working with a waterbrush I wetted the distant field and dropped in the colours: fingers, bricklane and clockwork, moving them about with the waterbrush.
- The same technique was used for the start of the field to the front of this. Here I used the colour brickroad (this is a different colour to bricklane) first, often lifting the colour off the tip of the nib with the waterbrush and painting it in.
- With the paper still very wet I drew the furrows in the field allowing them to bleed out.
- Near the foreground I dropped in Bricklane and rain, lifting the colours off the nib with the waterbrush.
Step 3

Across the Yorkshire Wolds we have huge fields with mile after mile of old hawthorn hedges (often in need of repair). These are a distinctive feature of our landscape and not to be missed in any painting of the area, so with the Graphik Line Painter I drew them in across the horizon.
As the sky was now dry there was no bleed and I was able to represent the open winter effect of this interesting hedge by simply drawing directly with the Line Painter.
Step 4

The open vastness of the landscape appears as I introduced the wild country plants along the field edge.
- Here I made representational marks with a combination of colours: clockwork, Bricklane and rain, drawn directly onto the dry paper then blended using the waterbrush.
- The white heads of the cow parsley were drawn with the graphite coloured Line Painter and developed by undercutting with the colour magic while whitening the top with the colour, snow.
- The leaning fence post and smaller near-vertical one with broken barbed wire and a nearby bare hedge were aslo developed.
- The fence posts were again drawn with selected colours and touched with a wet brush to blend while the bare hedge was drawn with the colour magic, giving a very deep tonality and pushing the distant hedge further back.
- Lifting with the waterbrush from the nib of the colour rain, shadows of the posts and wild plants were added.
Step 5

- I then introduced some splattering by flicking off the nib with the waterbrush to produce a satisfying bare earth foreground land mass.
- The paper needed to be very wet and care was taken when flicking from the nib to control the splatter; a little practice on a separate piece of paper was required before I could get the desired effect.
- I recommend slowly building this to the deeper tones by laying one splatter over another, allowing the first to dry and then re-wetting.
Step 6 - The finished painting
Evening Sun Setting Over Fields in Kilham, Derwent Graphik Line Maker and Painter on Derwent Sketchbook paper, (38x28cm)
Finally I drew more of the interestingly shaped wild country plants, applying the same colours and technique used earlier for the back of the field.
These were then strengthened by over drawing with the colour, magic.
Final thoughts
Both the Line Makers and Line Painters provide obvious usage for working in both graphics and fine art; they are delightful to hold and easy to work with. My experiments and the demonstration proved how easy the Line Maker and Line Painter are to work with and the wide range of styles they could be used for. I hope you enjoy using them as much as I do.
READ MORE ON DERWENT GRAPHIK WITH IAN SIDAWAY
Unlock a wider world of advice, expertise, news and exclusive offers specifically tailored to your passion for painting with our inspirational Painters Online emails today.

Sometimes we may include links to online retailers, from which we might receive a commission if you make a purchase. Affiliate links do not influence editorial coverage and will only be used when covering relevant products.