


'The striking orange-red markings on the koi’s white body were so captivating and dramatic set against the dark blue of the pond that I was inspired to paint it,' says Alison Fennell.
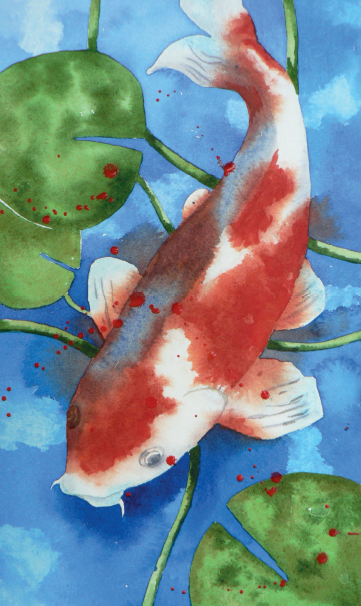
Koi Carp, watercolour, (24x14cm)
Alison's top tips before you begin
'Watercolour, used wet into wet, was the perfect medium for rendering this beautifully patterned fish and in the demonstration you will be focusing on how to achieve the perfect surface conditions to paint them.
'In this demonstration you will also work through initial loose washes and on to painting slightly abstract passages of water before adding the final details of lily pads and their sunlit stalks.
'Before applying the initial patches of orange-red, you’ll need to wet the entire inside of the fish with clear water and allow it to sink in to the point where there is still a faintly visible glisten of moisture. To see this, try holding the paper to the window or a light. This condition, which I call ‘satin’, is the perfect time to add the first washes. If you add them when the paper is running with water, you won’t have control of the colours, but if you wait too long and the paper becomes damp with no shine, painting onto the surface will leave you with unsightly watermarks. If you don’t succeed on the first attempt, just try it again'
Demonstration: Koi Carp

Your reference drawing of the carp
Step 1

1. Using your stretched paper, wet the inside of the fish with clear water and allow the surface to become ‘satin’ (see above).
2. Use a pale wash of cerulean blue to paint the tips of the fins, tail and mouth.
3. Mix French ultramarine blue and burnt umber to create a soft blue-grey and paint the left-hand side of the fish in this to create a shadow.
4. Add a much finer line of the blue-grey mix around the right-hand gill and the right-hand flank. This helps give the fish its roundness.
Step 2

1. Whilst still moist, use the No. 3 Round to paint a viscose mix of cadmium scarlet to create the markings. Don’t forget to place some of this colour where each fin joins the body. These strokes will blur softly, which is what we want at this stage.
2. If any passages bleed too wildly, simply use a thirsty brush – a clean, barely damp brush – to suck up the straying colour.

Step 3

1. Whilst still moist, add a stronger viscose mix of cadmium red deep with a speck of French ultramarine blue. This will give the markings more depth. Leave a fine margin of a few millimetres from the first wash showing to achieve a layered effect.
2. Lift out irregular sharper-edged white shapes with crumpled dry tissue paper. This will make the red patches pop.
3. Leave to dry completely.
Step 4

1. Mix a large puddle of Winsor blue and Winsor violet and begin painting the sections in between the lily pad stalks wet on dry. As you complete each section, use the No. 3 brush to drop cadmium scarlet into the blue area where there is a corresponding red patch on the fish.
2. Lift out texture in the blue areas with a dry crumpled tissue.
3. Using a No. 0 Round brush and a French ultramarine blue and burnt umber mix, paint the ovals that make up the fish’s eyes and add lines to indicate ridges on the fins and tail. Soften these with a slightly moist brush in places so that they relax into the painting and don’t look too drawn in.
4. Continue working around the fish in this way and add an extra strong viscose blur of Winsor blue and Winsor violet directly under the mouth and head to create the idea of a cast shadow in the water.
Step 5

Allow to dry completely before rubbing away any pencil lines that may still be visible.
Step 6

1. Paint the lily pads with a mix of sap green and raw umber, wet onto dry. Add extra patches of the same colour. Mix the burnt umber stronger in places to create variety and texture.
2. Paint the lily stalks in a more dilute version of sap green and raw umber and, as it dries, add much stronger patches of colour on the stalks to indicate shadows – especially where the stalks emerge from or go under the pads and the fish.
3. Leave the left-hand and top side of the stalks lighter and make the right-hand and undersides darker. This puts light into your painting.
Step 7

The finished painting Koi Carp, watercolour, (24x14cm)
1. Finally re-touch the fin and tail lines where necessary using the French ultramarine blue and burnt umber mix.
2. Splatter with a dilute mix of cadmium red deep to finish.
FOLLOW ALISON TO PAINT THIS SADDLEBACK PIG

Alison Fennell
Alison runs weekly watercolour classes in Pontypridd; email [email protected] for details. Find Alison’s card range, Alison’s Ark, published by The Museums & Galleries Collection, at WHSmith and shops attached to galleries and museums. Visit www.eastwitching.com for more information.
This demonstration is taken from the April 2017 issue of Leisure Painter

Comments
Login or register to add a comment