


Demonstration - Raindrops on a Sycamore Leaf
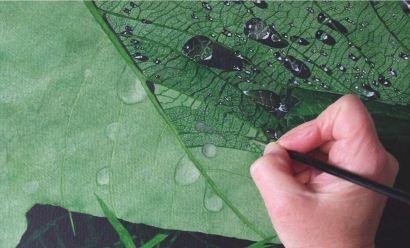
Step 1

This is the preliminary drawing. For this demonstration I drew the first stage with a darker mark so it can be seen; usually the drawing is marked in lightly. Pressing too hard will leave indents of the pencil line that may be seen through the watercolour paint. I always make a tracing of my composition. It can be useful for reference when the drawing becomes obscured by paint. Before you begin painting, frame your image area with masking tape. When the painting is completed remove the masking tape carefully to reveal a straight edge.
Step 2

1. With a No.7 brush apply two wet washes of midnight green mixed with a small amount of sap green to the sycamore Leaf. Let the first wash dry before adding the second.
2. Add two wet washes for the background (midnight green and mainly neutral tint), omitting the grass.
3. Paint the grass with a No. 3 brush using various mixes of sap green, midnight green and sunlit green.
4. From the top right, using midnight green, add the tiny details of the leaf with a No. 0 brush, and the veins with a No. 1 brush.
5. Lift out the main veins and raindrops with a damp brush.
Step 3

1. Wet a No. 2 brush with a little water and apply it to the raindrop area to loosen the paint. Lift some of the colour with tissues. Add midnight green where necessary for the veins. Build up the shadow areas with washes of neutral tint.
2. The small part of the sycamore leaf on the right of the painting is a darker tone, so using a No. 6 brush apply another wet wash of midnight green.
Step 4

1. Gradually increase the intensity of colour on the shadow areas of the raindrops using only a small amount of water and neutral tint. Use kitchen roll to remove excess paint from the brush when you are painting fine details. Lift some paint from the bottom of the raindrops with a wet brush.
2. Use a wet brush to smudge parts of the leaf where it is in shadow.
Step 5
1. With a No. 0 brush continue to add the fine details to the leaf, working each area in turn. This is where the tracing comes in handy; you can refer back to it if you have trouble seeing the pencil marks.
2. Add white gouache with a No. 0 brush for the highlights on the raindrops. The mixture should be quite thick so only use a small amount of water.
Step 6

1. Continue to work your way around the leaf, painting shadows on and below the raindrops. Shadows should also be applied to the more prominent veining.
2. On the small area of sycamore leaf on the right of the picture, use a wet No. 1 brush to loosen the paint for the veins. Go backwards and forwards with the brush over the vein you wish to create, then lift the paint with a tissue.
3. Add a rich wash of midnight green and neutral tint with a No. 3 brush to the shadow areas of the leaf.
Step 7

Continue to add veins with a No. 1 brush, and details of the sycamore leaf using midnight green and a No. 0 brush. The raindrops have more highlights so a larger quantity of opaque white gouache is needed. Keep the paint quite dry and only use a small amount of water. Add shadows of neutral tint to the bottom of the leaf where it is curled under.
Step 8
The painting is finished. I would suggest you now put it out of sight for a few weeks. Looking at it again with fresh eyes really makes a difference. Even then it is not too late to make alterations.
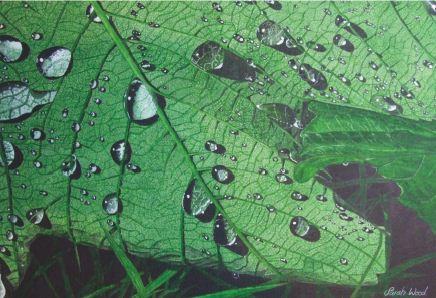
Sycamore Leaf, watercolour and gouache on cold-pressed watercolour paper, (30.5x40.5cm)
Sarah Wood is an associate member of the Society of Botanical Artists. She exhibits in London and with local societies on the Wirral. Visit her website at www.sarahwoodart.com
Comments
Login or register to add a comment
No comments