


Follow Kerry Bennett to paint this magnificent elephant, step-by-step, in watercolour.
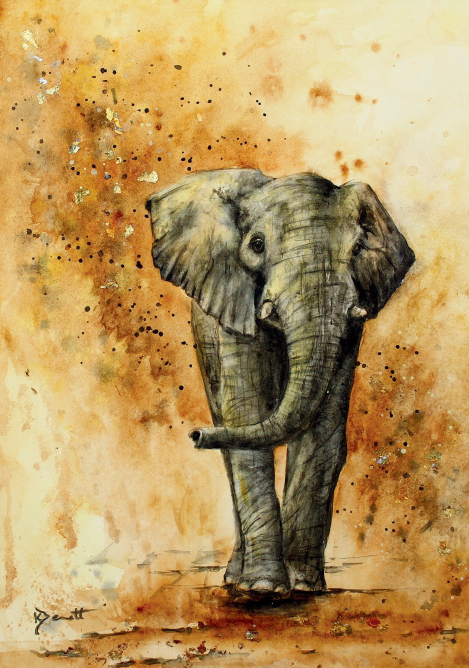
Elephant in Watercolour, watercolour on NOT watercolour paper, (42x30cm)
Top tips on using your brushes
- Use the Winsor & Newton’s No. 4 sable brush for the small detail.
- Use the No. 6 for larger areas.
- The No. 10 Round is used for applying water to the even larger areas.
- For flicking paint or water, use a very old brush, which is also used for scrubbing paint from the pans (so not to use up the fine points on your good brushes).

Demonstration: Elephant
Step 1

1. Begin by sketching the outline of the elephant, but not drawing much of the detail. This comes later with the painting.
2. Next wet the entire page with plenty of water, let it sink in a little and wet it again, making sure there are no puddles.
Top tip
Keep spreading the water until you feel the paper is saturated enough to stay wet for a little while. Have your water spray bottle handy and use it if you see dry patches forming.
3. Using burnt umber, raw sienna, burnt sienna and neutral tint begin adding colour to the background, allowing some of the paint to flow onto the elephant. Where the elephant has light areas, create depth by adding darker tones adjacent to these areas.
4. Whilst the paper is still very wet and, using a loose action, flick, dribble and tilt the paper and allow the watercolour to do its magic.
5. Using a damp thirsty brush remove some of the dark shades to increase the highlights while the paper is still wet. Then add a few more dark tones with the neutral tint while it is still wet. Take your time to decide where the shadow and highlighted areas are.
6. Use a water spray bottle to keep the paper wet and also flick clean water for added texture and effects.
7. Remove more of the highlighted areas on the elephant with a thirsty brush. Now that the first layer of the background is complete, leave it to dry.
Step 2

1. The next step is to wet an area of the elephant and begin adding the darker tones for the shading and the creases on the ears and skin. These will need to be darkened by applying a number of layers.
Top tip
Pay attention to the soft and hard edges and, to make life easy, have two brushes, one in each hand, so when you apply paint to an area, let’s say a crease on the ear, you can soften one of the edges with the other paintbrush, which has only clean water.
2. To create the creases of the elephant’s skin and ears, apply the first stroke of the paint wet into wet and add a few layers, then go into the creases again when dry. This gives the appearance of depth.
3. Keep on applying the darker tones and do not be afraid to go dark.
Step 3

Now back to the elephant to get the dark tones right.
Again, painting wet into wet, pay attention to the soft and hard edges.
Note that watercolour dries around 30 per cent lighter than when it’s wet so applying layers is important to build up the tones.
Step 4

1. Whilst the elephant is drying, add a bit more depth and colour to the background. Wet the background and add quinacridone gold and burnt sienna with more flicking and spreading of paint.
2. When the background is dry, flick in some burnt umber. As the paper is dry at this stage, the flicks are crisp, which creates a varied depth and texture.
Step 5 - The finished painting

Elephant in Watercolour, watercolour on NOT watercolour paper, (42x30cm)
1. Pick out a few shapes in the foreground for added perspective, just using your imagination to see shapes like rocks or stones. Don’t forget to add the very important shading.
2. Once the elephant is finished, add a glaze of quinacridone gold to make it blend in better with the background. A glaze is applying a layer of colour on an already painted area.
3. Darken some of the details a little by adding more neutral tint to create a few extra creases on the elephant’s skin by first using a very fine brush then softening with a damp clean brush.
Top tip
It is always a good idea to stand back from a painting and have a good look from afar or even look at the painting in a mirror. This makes you see things that you might miss if sitting too close to it.
4. Finish by adding gold for an extra special effect. Use pieces of gold leaf glued on here and there to add a bit of shine!
Follow Kerry to paint an eagle owl in watercolour
Kerry paints, teaches and demonstrates in Battle, East Sussex. Visit www.kerrybennett.co.uk and Facebook.com/kerrybennett.artist; follow her on X (formally Twitter): @kerryb_artist and Instagram: #kerrybennett.artist
Find more on painting animals in watercolour from Kerry in the October 2018 issue of Leisure Painter. Enjoy endless inspiration with access to past and present issues of both The Artist and Leisure Painter, plus exclusive video demos, tutorials and more, with our Studio Membership! Discover how you can join today.
Sometimes we may include links to online retailers, from which we might receive a commission if you make a purchase. Affiliate links do not influence editorial coverage and will only be used when covering relevant products.
Comments
Login or register to add a comment
No comments