


Demonstration - A weathered tree stump
Rather than drawing the entire tree stump I selected the most interesting area that included a full range of textures and tones. I worked from the photograph and an image of it open on my computer screen.
Top tip
A print is useful for an overview of the subject and the computer image is great for zooming in to look at areas in more depth.
With a subject like wood, which has a lot of intricate detail, I study the reference material before starting my line drawing so that I have a good idea of what I need to include. I omitted the foliage, as it didn’t add anything to the final drawing.

Your reference photograph
Step 1
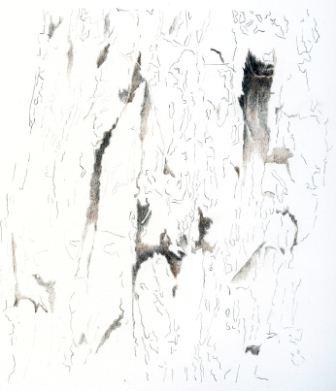
1. The line drawing
Make a line drawing using a 2B graphite pencil on scrap or tracing paper; only transfer it to your good paper when you are happy with the drawing. I included a lot more detail from the right side of the stump than the left.
How much detail you decide to include in your line drawing depends on how similar to your reference photograph you want your final drawing to be. If you want your final drawing to be a more or less exact copy of your reference material then add as much detail as possible including all the changes in tone and texture. However if you decide to use the photograph as a starting point and draw your own interpretation of the stump, you can create a much simpler line drawing.
I would usually include all the main colour changes, but not the fine detail; after all, viewers are unlikely to be able to compare the actual stump to your drawing.
2. Identify and draw the darkest tones
Look carefully at the reference photograph and identify the areas of darkest tone. These are the deepest layers of the stump where the bark has peeled away leaving shadow areas. Establishing those areas first will help you to decide the initial depth of colour for the mid-tone areas.
Use sharp pencils and start adding light layers of Van Dyke brown and dark sepia, building up a rich dark tone. Don’t create an even colour layer; bark has a rough surface so you want to make sure that there is plenty of variation in colour.
Top tip
Keep in mind that your pencil strokes should follow the direction of the bark. Be careful not to fill in all the tooth of the paper at this stage, as you will need to add some fine detail at the end.
Step 2 - Identify and draw the mid tones
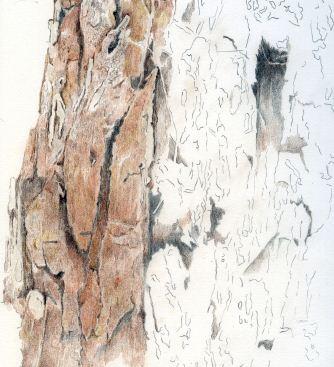
1. Study the reference photograph looking for the mid tone areas; the tones in this photograph fall mainly into the middle of the value range so in order to create interest you will need to vary the way you layer the colours.
Keep your pressure light and your pencils sharp so that you can build up the colour using several layers; this will help to create a realistic texture.
2. Working light to dark, use raw umber, burnt sienna and Prismacolor burnt ochre to create the mid tone areas on the left side of the stump. Remember that you are creating a tonal map so don’t worry about drawing the detail at this stage.
3. Keep adding layers until you have built up a rich layer of colour but there is some tooth left on the paper. If you aren’t sure how many layers to add, practise on a small piece of your good paper until you can judge the right place to stop.
Step 3 - Identify and draw the light tones
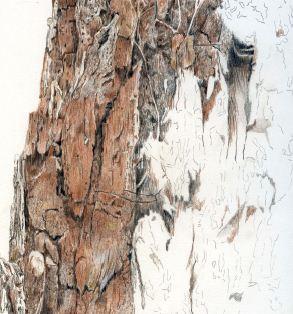
1. Select the warm grey pencil and continue to work on the left side of the tree by drawing in the lightest areas. As before work with a sharp pencil and a light touch building up the colour by applying several layers of pencil.
2. Add some Van dyck brown around the grey areas so that they stand out. At this stage you are still building the tonal map so leave any details until the next stage.
3. If you have already covered some of the lightest areas with pencil you can lighten the area by lightly dabbing with Blu-tack. Don’t worry if the lightest areas don’t really show; as part of the finishing touches you can add some detail using white acrylic or gouache
Step 4 - Refine the colour and add fine detail


1. Complete a tonal map for the whole drawing then select a small area to work on; the size of the area will depend on how much detail you want to add and how easy you find it to remember that detail when looking between the reference and your drawing. In the diagram above you can see the area that I chose to complete (above the red line).
2. Select all the colours already used and start to refine the area: layer the darker browns to suggest shadow areas and the lighter browns to suggest the outer areas of bark. Use a black pencil sparingly to create the very darkest shadow areas; don’t use too much black as it has a tendency to deaden any colours you layer it over.
3. Once you are happy with the tonal values use a sharpened dark sepia pencil to create a variety of random marks – little lines, circles and squiggles – always keeping in mind that bark has a rough texture. The image taken from the finished drawing shows the different marks I use to suggest holes, small twigs, layers of bark, etc.
Step 5 - The final touches
1. Look at the drawing as a whole and decide if any areas need darkening to give depth to the drawing.
2. Use a blunt burnt sienna pencil and press hard to smooth out the detail on the sides of the stump; this will help to create the illusion that the stump is a solid object.
3. Add touches of white acrylic or gouache in any areas that you want to stand out; such as along the edges of some of the areas where the bark has lifted.
4. Finally sign your name.
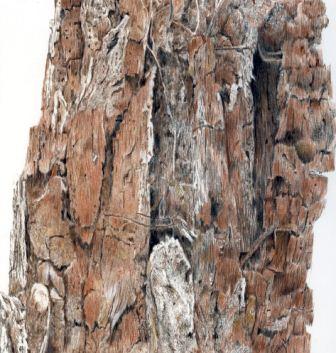
Weathered Stump, coloured pencil on paper, (22.5x22.5cm)
Learn how to draw a peacock feather, step-by-step, with Gayle
Learn how to draw fur in coloured pencil

Comments
Login or register to add a comment
No comments