



Dunlin, acrylic on board, (20x25cm)
Learn how to paint seabirds in acrylics with top advice and a step-by-step demonstration from Jenny Aitken.
Rarely still, birds on the beach are full of character. Stare at them and follow their antics and movements next time you get the opportunity! They comb the shoreline in a staccato rush, light feathers ruffling in the breeze. With loose brushwork and a touch of focused definition, it’s possible to capture that sense that they’re about to fly off the canvas.
Composition
It is worth analysing your image before you start to figure what you can blur, soften or cut out entirely. Crop your photos so that the birds are the main subject. Make one bird the focal point and experiment with blurring the rest. Omit aspects to make the composition more simple. Try to retain the sense of light and atmosphere, whilst concentrating on the birds.
Keep the main focal point and highest detail off-centre, to enable an interesting flow around and through the painting. In Oystercatchers (below), I created a relationship between the birds through the surrounding, zig-zagging shapes in the water. They attract and guide the eye. The centre-right bird is the focal point, emphasised by a touch more detail and form. I blurred the background to keep the focus on the birds.

Oystercatchers, acrylic on canvas, (50x20cm)
Construction
Put down a very thin ground first – a complementary to the overall colour of the painting works well. In the case of Oystercatchers (above) I used a pinky-orange. Then, to focus your observational skills, work from your photograph upside down. Add in the shapes of your birds with a thicker paint and a medium flat brush. Use the corners, side edges, flat face: think of it as paint application rather than drawing. Don’t allow yourself to fuss but try to be as accurate as possible with angles and shapes. Once the basic shapes are in, turn the photo back the right way and refine the body shapes by cutting in the surrounding colour, keeping background detail suggestive. Add detail and lighting effects last.
Top ten tips for success:
- Cover the canvas with a thin colour ground
- Using a large flat brush, work from your image upside-down to objectively discern the shapes.
- Work from dark to light.
- Start with loose shapes, finish with refined detail – the detail and light is the icing on the cake!
- Reserve small brushwork for final details.
- Clean your palette, water and brushes before highlights.
- Add a touch of yellow or red to white highlights, to make them sing.
- Use large, directional brush marks in untextured (beach, sea, sky) areas to guide the eye around the painting.
- Step back from your painting often to evaluate.
- Photograph your painting when done and view it on your phone/computer. Any genuine issues will stand out.
Exercise to try
Observing a photograph upside-down changes the way you interpret it. I find that it sharpens my ability to discern tones, shapes and negative space. Try a quick black-and-white painting of your subject, keeping the photo upside down from start to finish. It’s a great warm-up to a subject and gets you used to the shapes and textures before the complication of colour is involved!

Demonstration: Dunlin
You will need:
- Surface: 25x20cm acrylic board
- Brushes: Large, medium and small flat, small rigger
- Acrylic paints: Titanium white, lemon yellow, cadmium red, ultramarine, phthalo blue, sap green, phthalo green

Reference photo
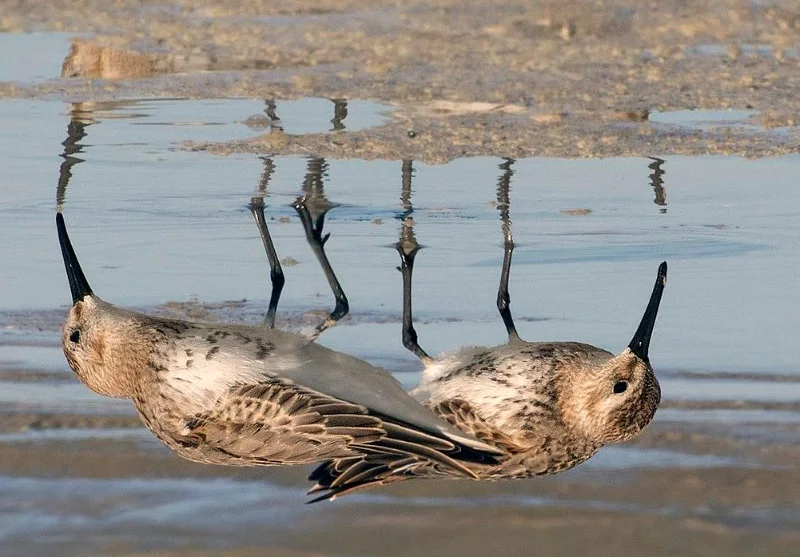
Reference photo turned upside down
Step 1

On a thin red ground, and working with the image upside down, use a wet wipe to cut out the general bird shapes.
Then mix the darks from cadmium red, ultramarine and a little sap green, and apply this loosely with a medium flat brush.
Step 2

Mix a buff colour from red, yellow, sap green, a touch of ultramarine and white and apply this with the same flat brush.
Top tip This is the colour I see in the photograph – but you may see something else, so observe and mix intuitively!
Step 3

Fill in the bird’s tummies with a cool grey (lightened ultramarine/red/sap green mix) and add some cool shadows and lighter tones, picking out loose details such as eyes and beaks.
Top tip At this point I turned the painting and photo round the right way, to add in the background and refine the shapes.
Step 4

Using a large flat brush, cut in the water with white, ultramarine, touch of red and phthalo green, and land, using sap green, red, a touch of blue and white, leaving some of the ground visible.
Start refining the colours on the birds with a medium flat brush.
Add some more white, phthalo blue and green to the sea mix to increase the vibrancy of the water.
With a small flat, add some detail and light to the front bird.
Top tip It doesn’t matter if some of the birds are lost at this stage – it can augment the sense of movement and you can always add a little detail back in.
Finished painting

Dunlin, acrylic on board, 20x25cm)
The finishing stage is all about what works best in the painting rather than adherence to the source image.
Use some warm colour, a mix of red, yellow, sap green and white, to lift the foreground, increasing the sense of depth.
Add detail and highlights to both birds with the small flat, then with a rigger to the right-hand bird, a mix of white, yellow and red. This colour also works for a touch of zig-zagging detail and dots on the water.
With the medium flat, lightly brush a watered-down highlight over the left-hand bird. This blurs any salient detail and knocked her further into the background.
If you've enjoyed this acylics project, take a look at Jenny's guides on how to paint crashing waves, painting light on water, and painting a lively market scene.

Jenny Aitken has been painting professionally for over 20 years, and exhibits across the UK. She tutors workshops and demonstrations to art societies throughout the UK. Jenny can be contacted through her website www.jennyaitken.co.uk
Comments
Login or register to add a comment
No comments