


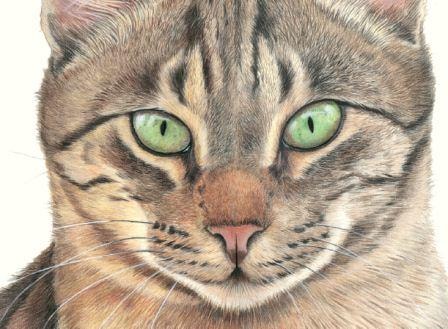
Detail taken from The Cat Next Door, coloured pencil, (40.5x30.5cm)
Gayle Mason covers the techniques and materials needed for drawing animals in coloured pencil. Gayle shows how to draw fur step-by-step.
There are several large manufacturers making artists’ quality coloured pencils, and selecting which pencils to use is a very personal choice. When I’m drawing animals and birds I use the non-water-soluble ones, because I find these easier to blend.
My favourite pencils are Polychromos, which are manufactured by Faber-Castell and come in a range of 120 colours.
Most of the colours are highly lightfast and they are oil rather than wax based, which is great for the way I work, as they keep a sharper point for longer. However, I have not found any problems mixing brands together, so if I find a colour I particularly like, I will add it into the drawing.

For Big Red I used a variety of coloured pencils and a touch of watercolour to draw this cat.
The challenge was to create the different fur textures found in the short silky fur of the body and the much longer fluffy fur of the tail.
Best paper for coloured pencils
Like the coloured pencils, paper is very much a personal choice, you need to make sure it is heavy enough to take all the layers of pencil without buckling.
I use hot-pressed watercolour paper such as Fabriano Artistico or Arches (300gsm), as it provides a very smooth surface to work on and this is vital to the success of my technique.
When choosing a paper you need to consider its texture, weight and shade of white: cool white or warm white. If I want ultra-white paper, I use Artistico Extra White.
What else do I need for coloured pencil drawing?
- Blu-Tack - for lightening lareas of colour. Using a dabbing rather than rubbing motion avoids damaging the surface of the paper.
- A pencil extender - for use when a pencil becomes too short to hold comfortably in the hand or is too short to be sharpened. This extends the usable life of the pencil.
- Battery or electric sharpener - a sharp pencil is essential, so to minimise wrist strain use either a battery or electric sharpener.
- Battery eraser - for removing small areas of colour a hand-held battery eraser is useful, although it is impossible to erase completely back to the white of the paper.
- Indenting tool - a useful tool for create whiskers or light coloured hairs in an area of dark fur.
- Mechanical pencil - idea for drawing the outline and making sure lines are easily erased. If you do not erase the graphite, it tends to muddy your colours.

Demonstration: Drawing fur
Step 1
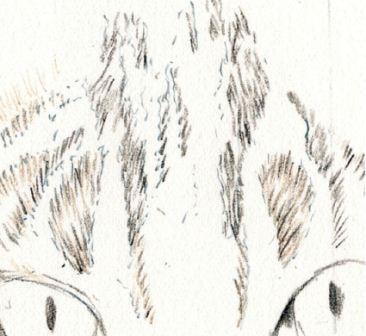
Selecting a mid-tone colour and using a light pressure, start to draw the darker areas, which will give you a framework to work with.
Keep in mind the underlying structure of the animal so that your strokes follow any bumps or hollows created by bone or muscle.
Top tip: Make sure that your strokes are random so that the hairs do not appear to be in rows. You don’t want your animal to look like it has just visited a hairdresser!
Step 2
![How to draw fur in coloured pencil]()
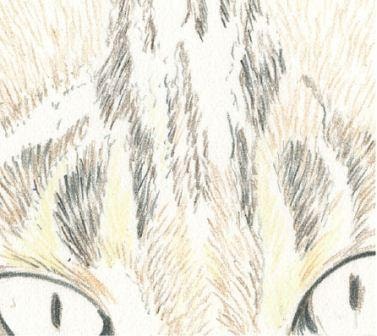
Using both darker and lighter colours fill in between the areas completed in Step 1.
Use a very light touch and make sure your strokes follow the direction of the hair.
Step 3
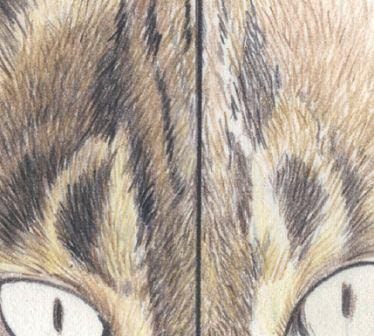
You now have the basic pattern of the fur so start adding the layers.
The illustration has been divided so that you can see the progression. The left-hand side has many more layers than the right.
Add both darker and lighter colours at this stage until you’re happy that you have achieved the desired effect.
Step 4

The final stage is about making sure that all the paper is covered and adding the final touches.
Add some light hairs in the dark fur and a few dark in the light to increase the feeling of depth.
Include the whiskers and the catch light in the eye.
This is also the stage when you ensure you have a full range of tones in your drawing. If it appears to have too many mid tones, add some more shadow or highlights.
When the drawing is finished, put it away for a couple of weeks before taking a final look. I find I can then evaluate it with fresh eyes making it easier to see if you need to change anything.
I also turn the drawing upside down as again that makes it easier to see any areas that need altering.
Detail taken from The Cat Next Door, coloured pencil, (40.5x30.5cm)
My technique involves adding many layers of lightly applied colour. By building the colour in layers I can achieve subtle changes in both colour and texture. When drawing or painting an animal, the strokes always follow the direction of the hair. To create long or short hair, I change the length of the stroke.

Gayle Mason has been selected for the David Shepherd Wildlife Artist of the Year at The Mall Galleries, London and the prestigious National Exhibition of Wildlife Art in the UK. Her drawings of cats can be seen each year at the annual exhibition of the Society of Feline Artists at The Llewellyn Alexander Gallery, London. She has also exhibited at several smaller galleries in the UK and USA. Gayle lives in Yorkshire with her husband, grown-up sons and several rough collies.
Comments
Login or register to add a comment