



Sarah McWatters, oil on linen, 19¾x15¾ (50x40cm).
Kathy Barker takes you through the basics of how to paint a nose. The nose as a centrepiece not only characterises someone, it is also essential as the most useful reference point.
The Van Dyck Z - taking the top line of the Z as the eyebrow, the oblique as the angle of the nose and the bottom line being the end of the nose and base. If you get nothing more down on the canvas than the shape of the nose and follow through to one of the eyebrows, you will be able to see a likeness to your sitter.
Position - When working on a portrait you generally place the sitter’s eyes at your eye level. So, if you are standing at an easel you need to place the chair for your model on a platform about 18-inches high. As you work from life it’s natural for your model to slowly droop or shift position. Regularly check and direct your sitter to the angle of the nose you have on your canvas.
Lighting - It is so much easier to paint a nose if you have a shadow side; easier still if the nose is turned toward the shadow side rather than into the light, which is more difficult.

Materials
Canvas
...tinted with a bit of ivory black, yellow ochre and a little turpentine, brushed on freely and rubbed back lightly with a rag or applied with a rag if preferred. This allows the white of the canvas to show through, rather than adding white to your colour mix, which will make subsequent applied hues sink and appear chalky.
Colours
Use an earth palette: Old Holland titanium white, yellow ochre, Chinese red (or Daler-Rowney Georgian cadmium red light which is much cheaper), light red, Venetian red and ivory black. Useful additions are raw umber and burnt umber.
Brushes
Use hog hair round brushes and filberts for initial drawing, or paint direct with sable filberts sizes 10, 8, 6, 4, plus a size 0 round brush and a blending soft flat brush is useful.
Medium
...use Michael Harding Oleo resin or linseed oil if preferred. The rule of thumb is fat over lean. Start lay-ins with a paint such as raw umber for your drawing and add a little turpentine. As you build up subsequent layers of paint you can add more painting medium to your paints. The more medium you add the softer the brushwork becomes. You can also move shapes around with unloaded brushes by dragging the brush. Mediums also glaze in terms of making the colours more transparent if desired and this can help produce subtle half tones between your darks and lights.
Step 1

First establish the angle of your nose. If you are on a three-quarter turn, close one eye and, holding your brush at both ends, align it so it is parallel to the nose angle. Without moving your arms, twist your waist back to your canvas; the angle of your straight edge is the angle of the nose.
Draw/paint the line of the angle using slightly thinned brown (you generally paint shadows first as you build light over dark). You can delineate bumps and idiosyncrasies at any time but there is no point doing so if you have not got the basis of the nose right at the outset.
I generally start with the nose for a portrait painting and then work my way out by angle finding the bridge of the nose to brow which leads up to the eyebrow. The nose determines the scale of the portrait, as all elements and features of the face will be relative.
Step 2
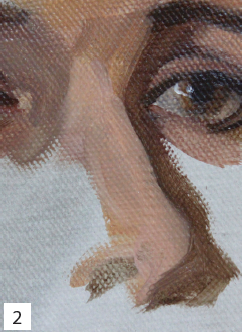
For the wings of the nose do a plumb line to see how wide a wing is in comparison to some other feature like the eye or the ridge of the nose. Initially just mark it. Later you can describe it more fully including painting the skin around the wing, which will often be lighter.
On a three-quarter turn the shadow-side wing may not be too visible but there will be shadows to paint, often across the face a little as well as under the base of the nose.
Top Tip keep the edges of the cast shadows soft – use your finger or a soft clean brush.
Use a smaller filbert in a fairly dark value to demarcate the nostrils. Nostril shapes are often a comma-like shape on its side.
Step 3
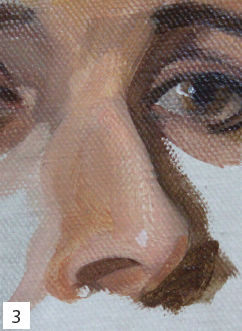
Now look at lighter skin tones adjusting the brightness with either a spot of grey to knock back the hue, or modifying with a brown.
The side plane of the light side of the nose will be a little darker in value but it can be very similar to the bridge of the nose; the hue may be slightly different and perhaps cooler.
Look for your highlights; there will be one on the tip, which you should place correctly as it describes the form of the nose. Sometimes you see highlights running down the length of the nose, more often there is a lighter patch on the ridge level with the eyes.
Top Tip If you place highlights on the nose quite close to the bridge the nose will look skinny; wide placement describes a broad nose, so do really study what you see, as the more correct you are the better the likeness will be.
Step 4
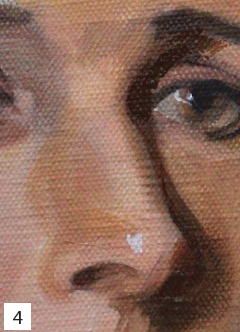
Look for the darker halftone that meets the shadow side of the nose ridge. Then go for the lighter value that runs down the top plane of the nose. This helps to make the nose turn under. The more you soften or lend the bridge to the shadow side of the nose the more you will get a three-dimensional feel.

If you're new to oils, don't stop here! Explore our other beginner-friendly guides to learn all you need to progress and develop your oil skills.
Nose into the light
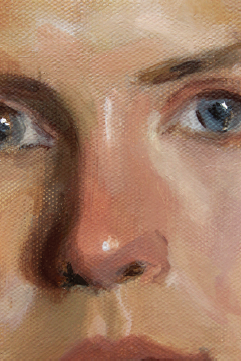
Use exactly the same process for painting a nose facing into the light, except the bridge of the nose often carries the same colour value as the face and is often of a similar hue. Note how a pink-based colour was used for the ridge and it is subtly juxtaposed with the yellow-ochre based hue of the face.
Here you can see clearly how the hue used under the tip (or bulb) of the nose adds three-dimensionality as it contrasts with the warm pink colour that describes the top side of the bulb.
Slightly tilted down

Note the cool colour used here on the side planes of the nose and the highlight running down the length of the nose.
Different skin tones

Exactly the same colour palette has been used here. Light red and yellow ochre make those warm lighter colours. Transparent layers can be done using paint thinned with a painting medium. Note the flared wings. Every nose is different.
Nose profile

The main thing with a profile nose is to get the outline shape absolutely right.
Kathy Barker studied fine art painting at Wimbledon School of Art and portraiture at Charles Cecil Studio, Florence. Kathy tutored for several years at West Dean College and currently teaches at the Roehampton Club, London, and holds a weekly portrait class at her studio in Fulham. She has exhibited with the Royal Society of Portrait Painters and exhibits annually with the Society of Women Artists, of which she is an associate member.

Comments
Login or register to add a comment
No comments