


What is a line? A line is a dark or light mark left on a surface by an instrument or tool. (My definition.) The mark can be thick or thin. It can be in black or white or a colour. It can be straight and of constant thickness or curvy, broken and of variable thickness. Which sounds and looks the more interesting (a) the straight, constant thickness line or (b) the curvy, broken, changing thickness line (see illustration); (b) is much more interesting. Every inch of it is different and worth looking at carefully. I would suggest that this is the style of line to develop.

An assortment of lines made with a variety of implements
Let us consider the types of tools and materials that are capable of producing lines of this kind. There is the obvious one, the pencil. Both lines (a) and (b) were produced using a pencil, but not the same pencil; (a) was drawn with a thin leaded mechanical clutch type, (b) with a soft 4B wooden pencil, pressing down hard at times, rolling it in the fingers, and easing off the pressure occasionally.
Soft pencils, therefore, are good tools for producing interesting lines.
Pens are another possibility. There are many from which to choose these days. Most stationers have racks full of various pens capable of making thin, thick or coloured lines. Some are waterproof, but most are not. If you want eventually to put a wash of perhaps watercolour over the lines, check that the ink is waterproof. Also be careful of pens whose ink is not lightproof. Many of the spirit-based inks fade very quickly when exposed to sunlight. I have tested the Edding range of pens and found them to be both waterproof and lightproof, but experiment yourself to find a pen that suits you.

Village Church. Line and wash, 11” x 15”
Inks
Ink comes in many colours, including black and white. Some are waterproof but many are not. Check this before buying. With a bottle of black waterproof ink, many more tools are available to you to make lines. I collect steel pen nibs and holders, which are not so easy to find these days. I like a steel nib that has some spring in it. It is capable of producing some very interesting lines (see illustration below).
Sharpened wooden sticks make good drawing tools. I sometimes sharpen the wooden handle of an old small brush into a point. Try a sharpened matchstick or a cocktail stick. Dip them in the ink and try them, they all make very interesting lines, especially as the ink begins to dry. The lines develop a textural quality that I like very much.
A small sable brush is another pleasant tool which is capable of instant variation in line thickness. Try holding with the first finger and thumb, a small sable or nylon brush filled with ink, perfectly upright, with the point just touching the surface of the paper. If you find it difficult to control the point, rest your little finger on the surface. Charcoal, Conté, are all good line-making tools. Try them all.
Washes
Watercolour is, of course, transparent, which means it is perfect for line and wash work. It leaves the line clear and sharp. If you are happy with your drawing and the ink is waterproof, no harm can come from flooding wet colour over it. I like to make the washes look fresh and not too carefully controlled, overlapping the line work at random.

The Buttercross, Oakham. Line and wash, 11” x 15”
The linework in The Buttercross, Oakham, was produced using a rigger brush Number 2 and waterproof black ink. I started by very lightly pencilling in the main shapes with a 4B, just rough outlines to get the proportions right. When I was satisfied with that (a very important stage and well worth getting right) I dipped the tip of the rigger into the ink and started on the left side of the paper. Being right handed, I worked across, adding window details as I went.
I like the way the brush soon begins to dry out and instead of hard lines, leaves lighter textured lines which I find a pleasant combination. Where tones are really dark, I fill in nearly solid black. I prefer to see a drawing that is not too hard and sharp, but has a fresh sketchy look. Remember, every line and mark that you make must be in the right place and be interesting enough to look at individually.
When I am satisfied with the drawing, I consider the washes. Starting with the sky, I flood in, with a big brush, areas of just water, then picking up a little phthalo blue, touch that into and around the wet areas. Next I wash over all the buildings with a thin wash of yellow ochre and in the brick areas, burnt sienna and ultramarine blue. am deliberately not too careful with the washes, so that I am left with a spontaneous fresh appearance to the finished painting.
Pleasant marks

Village Street. Line and wash, 11” x 15”
In Village Street, I used the wooden handle of an old brush, sharpened to a point and dipped into the ink. At first it gives a solid black line, but soon begins to dry out producing much softer textured lines. It is surprising how long the drying ink continues to produce pleasant marks.
Again, I lightly drew in the main shapes with a 4B pencil before committing the ink to paper. Having drawn the outlines I decided to mass in the really dark areas with a chunky black spirit-based felt pen. The marks looked incredibly black at first but as soon as I started to put the fairly strong colour washes over them, they began to blend in nicely.
Most of the greens are mixed using ultramarine and Indian yellow. The cottage stone walls started off with a wash of yellow ochre. The pale blue in the sky was phthalo blue. The shadow across the road is a mixture of brown madder, alizarin and ultramarine blue. The red roof is light red, a very useful colour to have in your box.
Sharpened stick
After rain – Preston was another sharpened stick ink drawing, redrawn from the pencil drawing done in my sketchbook, on the spot, sitting in the car, after a morning of heavy rain. I was very taken with the puddles in the road as well as the interesting perspective of the cottages on the rising land.
Back in the studio, I chose 15” x 11” sheet of Bockingford 200lb unstretched paper, I stuck the four corners only on to plywood with masking tape. Do not attempt to stick down more than the corner because as the paper is wetted it expands and if it is restricted along the edges, it will cockle badly.
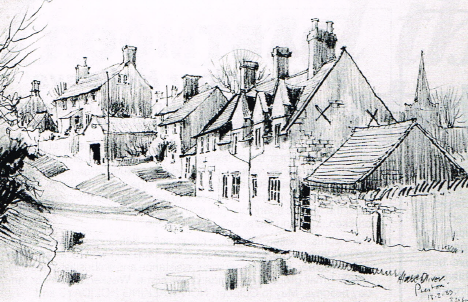
Pencil drawing for ‘After Rain – Preston’
As usual I started with a light pencil drawing to establish positions. Once happy with those, I started with the ink on the left hand side with the cottage on the top of the hill. Notice, I did not ink round the first cottage or the church in the background. This was to make them appear more distant. I decided my colour scheme would be just three colours: Payne’s grey, raw umber and yellow ochre.

After Rain – Preston. Line and wash, 11” x 15”
I started by washing the whole surface with pale yellow ochre. When that had dried, I used a pale wash of raw umber for the distant cottage. I darkened the same wash slightly for the front faces of the nearer cottages. Payne’s grey on its own for the distant trees and church, also for the road, being careful to work around the puddles. Raw umber next for the roofs and for the really dark areas, a mixture of raw umber and Payne’s grey.
I aimed at producing an atmosphere of strong sunlight coming from the left, lighting up the fronts of the houses. The puddles help to make the foreground more interesting.
If you enjoy drawing, try line and wash techniques. Experiment with different tools until you find the one that suits you. You will find that line and wash is a good way to produce interesting paintings quickly and it will give you excellent watercolour experience.
")


Comments
Login or register to add a comment
No comments