


Teddy bears are excellent subjects to use as models when learning pencil and brush techniques. The learning experiences offered by this charming subject are many, from discovering how to suggest hair, fabric and rope, to the effects of tension on seams, contrasting textures, facial expressions and the placement of limbs.
It may not be your ideal choice as a subject for completed drawings and paintings but it will give you a chance to cover many aspects of drawing in one study, and you may find you enjoy yourself more than anticipated.
If you are a complete beginner or have only done a little drawing but are having problems portraying what you see in front of you on the flat surface of the paper you may find my first exercise of help.
Exercise in accuracy
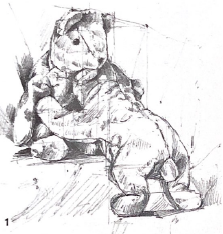
Figure 1 First rough of beanbag teddies helps to establish the accurate positioning of the bears
For this illustration (figure 1 above) I have chosen two of my beanbag teddies and arranged them in a position that offers an ideal opportunity to practise perspective; the relationship between two objects – one compact, the other a stretched form; and the use of vertical and horizontal lines as a personal grid to help place the forms accurately. The study also encourages the observation of fabric folds, seams and an awareness of negative shapes.
I hope to show how the execution of a particular subject can relate to a totally different subject by arranging the back legs of one of the bears in a way that resembles a position often adopted by a puppy dog. Similarities may be seen between an inanimate object and a live pet that has no desire to remain still long enough for you to make a drawing or sketch.
Beginners often worry about where to start, and the answer really is up to the individual. Working from within the group or subject, rather than drawing an outline, can be a useful starting point. Noticing negative shapes within the group and by placing these correctly, automatically positioning the surrounding objects, makes accuracy easier. With pets and other living creatures, however, it is a good idea to start with the eyes.
This suggestion also applies to teddies, and the eye position of the upper bear was placed on the paper first. From this, vertical and horizontal lines assisted in the correct placing of ears, seam positions and this teddy’s relationship with the lower bear.
Regard this drawing as a first ‘rough’. It is drawn in order to place the subjects correctly, so it doesn’t matter if mistakes are made and corrected without the use of an eraser at this stage. More can be learnt from drawing lightly at first and correcting mistakes with heavier, darker marks as you progress, than from erasing every mark you feel is misplaced.
If you are concerned about where to start on the paper for fear of finding the drawing travelling too far to one side, don’t worry. If this happens, simply tape another sheet to the edge and continue to draw over and onto it. When you finally trace the image off onto a good sheet of paper you can easily reposition the subjects. This freedom is the beauty of executing a rough sketch first. Only the lines that you consider to be in the correct position will be transferred to the good paper. I find ordinary office copier paper ideal for rough sketches – and it’s also inexpensive.
Bear study
A line was drawn vertically from the eye to the ear to establish the relationship. A horizontal line helped place the other ear. I then considered the shape between the seam near the eye and the side of the head below the second ear. Looking at the area between the seam and the back of the head led me to establish the neck position and the shape of the chest situated between the second bear’s head and arm.
Other guidelines were run up and down to make sure the lower bear related correctly to the eye and ear positions established above. The centre seam of the lower bear’s head was then drawn, followed by the ears and arm, from which I was able to place the remaining areas of the seated bear before working down the lower half of the standing form with legs bent backwards.
Particular attention was paid to the negative shape between the back legs as well as the shapes between seams and folds as they related to one another. By learning to train our eye to look at the shapes rather than drawing an outline around the edge and trying to fit things in, we can piece the drawing together – rather like a jigsaw.

Figure 2 Beanbag Teddies. Derwent watercolour pencil 6” x 5½” (15.2cm x 14cm)
When the ‘rough’ was completed, I traced only the essential lines onto a sheet of tinted, 140lb Bockingford watercolour paper, using a Rexel Derwent watercolour pencil sharpened to a fine point. I chose cream for the tinted paper and copper beech (61) for the coloured pencil (figure 2 above).
Having made my mistakes while working on the ‘rough’, the outlines on the cream paper were now in the correct positions and I could enjoy working on the monochrome study and concentrate entirely on achieving textures and effects of folds etc.
The tonal areas were built gradually, one upon another, using a very sharp pencil and a cross-hatch method to produce the gradation of tones. The sharp point allowed me to cut in crisply with dark areas set against light, untouched, paper. I enjoy working on Bockingford paper as the pencil glides smoothly over the surface, allowing the shadows in the folds to merge subtly. With just a little more pressure the darks are easily established.
When the drawing was complete, I used one of my favourite ABS brushes – a Series 3, No 8 Pure Kolinsky Sable, which has a large carrying capacity, firm spring and good point. This gives an even flow, which I find helpful when painting the fabric or hair of bears. The coloured pencil marks were gently blended with clean water. The No 8 brush has been used for all these illustrations as the point allows crisp edges to be defined and the capacity for holding water makes it easy to blend over the larger areas.
Long-haired bear
For my next illustration of a long-haired grey bear, I chose 140lb grey Bockingford watercolour paper and an ivory black (67) Derwent watercolour pencil (figure 3 below).

Figure 3 Long-haired Grey Bear. Derwent watercolour pencil. 10” x 8” (25.4cm x 20.3cm)
The eyes and ears were positioned first, followed by the muzzle and shapes between muzzle and arms on both sides. Guidelines on a rough drawing helped to establish the position of the limbs. These appear stiff as the bear is jointed and filled with padding rather than the beans that gave a floppy effect to the bears in my last demonstration.
To avoid an outline around the edge of the image, I placed light areas against dark and dark against light at the top of the head. When a contrast of light against dark is required to bring an area forward (as with the paw) the greatest intensity of dark tone is placed behind the light fur of the paw and a wash of clean water will blend the watercolour pencil out to merge with the tint of the paper. Notice a light edge to the upper part of the hind paw here.
When tones on the subject and background are similar in small areas, the drawing can be enhanced by allowing the two to merge (as I have indicated at the edge of the bear’s arm). Retaining a lighter edge (as indicated on the pad of the other hind paw) helps to give the impression of a rounded surface and placing a rich, dark tone behind light areas where there is a shadow present will greatly emphasise the contrasts. The hair is drawn with pencil strokes that follow direction on the form.
Working in monochrome will allow you to concentrate more fully on the importance of tonal contrasts which are essential to bring ‘life’ to your artwork. Adding a little colour, in the form of a coloured pencil on tinted paper, will create that extra interest.


Figures 4 & 5 Method sheets describing the various techniques used in the bear drawings.
")

")

")
")


Comments
Login or register to add a comment
No comments